How to Properly Load your Oil/E-Liquid Vapor Chamber
If you have not used a bottom loading chamber before, we are going to take you through the finer points here and make sure that you…don’t make a mess. Grab your OG and let’s get started.
HOW YOUR OIL/E-LIQUID VAPOR CHAMBER WORKS
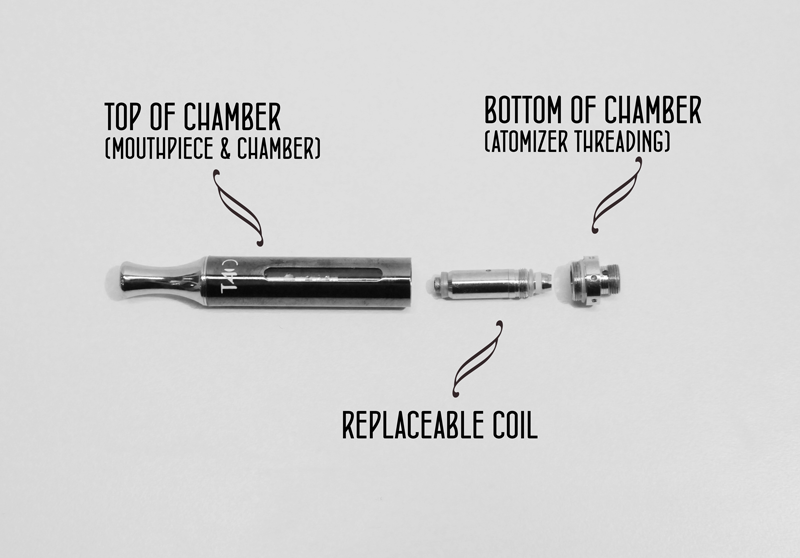
There are 3 parts: the top (mouthpiece & chamber), the bottom/base (atomizer 510 threading) and the replaceable heating coil. The top chamber has a cylinder that runs from the bottom to the top in the center – this is your airway. The airway connects to the replaceable heating coil (that’s what those gaskets are for – don’t take ’em off!). Then finally the heating coil screws into the atomizer threading. That’s what touches and connects to your battery. You follow’n me? All right, let’s move on to bigger things.

LOADING YOUR VAPOR CHAMBER
Unscrew the bottom the chamber by twisting the silver ring at the bottom counter clockwise. Then flip the top of the chamber upside down like in the picture below. Take your needle bottle filled with whatever you are wetting the whistle with these days, tilt down and slowly fill around the sides. Remember that center cylinder we talked about? Yeah…I thought so – that’s your airway. You don’t want juice goin’ down the wrong pipes, so fill around the sides and only up half way.
The final step is to let the oil or e-liquid soak into the wick (this is called wicking). Let it sit for 1 to 2 minutes after filling.

THE REPLACEABLE COIL
This is what makes your vapor chamber tick. You take care of it…it takes care of you. So we felt it necessary take a look under the hood so you know what your dealin’ with. The coil has to be snug (finger tightened) into the atomizer threading and it will be perfectly even with the bottom of the atomizer threading. See, the contact has to be flush with your battery or you will get flashing LED on your battery. In the picture below, the electrode is flush with the bottom of the atomizer threading – not sticking out too far, and not too far in.

THE O.G. RULES
RULE #1 – Never dry burn your vapor chamber (this is when the chamber is empty, you press and hold the power button heating the coil and potentially scorching/burning your wick). You do that? Guess what wise guy? It’s lights out for your coil. So keep that chamber full of liquid.
RULE #2 – Keep your baby clean. If you get e-liquid or oil on the outside or on the bottom of the vapor chamber, you gotta wipe it down. Show some respect!
RULE #3 – Replace your coil every six months. You got that 30% coupon when you registered your warranty right? Right!? Well, I’m just sayin’ maybe you take that coupon for a test drive and get some of those coils.
STAFF INSTRUCTIONAL VIDEO
COMMON ISSUES
I am not getting any vapor?
Make sure your battery is fully charged and turned on (hit the button 3 times in rapid succession). Then make sure you have liquid in the chamber that has wicked into the coil (see above). Then finally, make sure your vapor chamber is seated properly with your battery. There will be a small gap between the bottom of the vapor chamber and your battery electrode (top part of battery). This allows for air flow into your vapor chamber and bigger vapor hits. If you are still running into trouble, it means your coil is not screwed in all the way to the base of the chamber. Make sure that the coil is screwed in snug to the base and flush so the electrode has good contact with the battery.
The LED is blinking on the power button. What do I do?
This means you have over-tightened the vapor chamber to the battery. It’s probably also terrible to hit – feels like you are breathing through a straw. Loosen it a very small amount and it will allow the electrodes to be flush (vapor chamber electrode and battery electrode) and have better air flow. If you look closely, you will see little slits on the sides of the bottom of the vapor chamber – that is for air flow. Remember to not over-tighten the vapor chamber when you attach it to the battery.
Mine tastes burnt. Help!
You have dry burned your coil and it will need to be replaced. See rule #1 above.


